
Hyundai Tucson Owners Manual
Voice recognitionMultimedia System / System controllers and functions / Voice recognition
Using Voice Recognition
Starting Voice Recognition
Shortly press the  key on
![Hyundai Tucson: <b>Voice recognition</b> Hyundai Tucson: <b>Voice recognition</b>. If prompt feedback is in [ON], then the system will say ÔÇťPlease say a command](images/3/page.h317.gif)
If prompt feedback is in [ON], then the system will say ÔÇťPlease say a command after the beep (BEEP)ÔÇŁ
- If prompt feedback is in [OFF] mode, then the system will only say ÔÇť(BEEP)ÔÇŁ
- To change Prompt Feedback [On]/[Off], go to
![Hyundai Tucson: <b>Voice recognition</b> Hyundai Tucson: <b>Voice recognition</b>. [System]](images/3/page.h318.gif)
![Hyundai Tucson: <b>Voice recognition</b> Hyundai Tucson: <b>Voice recognition</b>. [Prompt Feedback]](images/3/page.h319.gif) [System]
[System]
 [Prompt Feedback]
✽ NOTICE
For proper recognition, say the command after the voice instruction and beep tone.
Contact List Best Practices
1) Do not store single-name entries (e.g., ÔÇťBobÔÇŁ, ÔÇťMomÔÇŁ, ÔÇťKimÔÇŁ, etc.).
Instead, always use full names (including first and last names) for all contacts (e.g., use ÔÇťJacob StevensonÔÇŁ instead of ÔÇťDadÔÇŁ).
2) Do not use abbreviations (i.e., use ÔÇťLieutenantÔÇŁ instead of ÔÇťLt.ÔÇŁ or ÔÇťSergeantÔÇŁ instead of ÔÇťSgt.ÔÇŁ).
3) Do not use acronyms (i.e., use ÔÇťCounty Finance DepartmentÔÇŁ instead of ÔÇťCFDÔÇŁ).
4) Do not use special characters (e.g., ÔÇť@ÔÇŁ, ÔÇťhyphen -ÔÇŁ, ÔÇťasterisk *ÔÇŁ, ÔÇťampersand &ÔÇŁ).
5) If a name is not recognized from the contact list, change it to a more descriptive name (e.g., use ÔÇťGrandpa JosephÔÇŁ instead of ÔÇťPa JoeÔÇŁ).
Skipping Prompt Messages
While prompt message is being stated
 Shortly press the
 key on the steering remote controller
The prompt message is immediately ended and the beep tone will sound. After the ÔÇťbeepÔÇŁ, say the voice command.
Re-starting Voice Recognition
While system waits for a command 
 key on the
The command wait state is immediately ended and the beep ton will sound. After the ÔÇťbeepÔÇŁ, say the voice command.
Starting voice command.
Shortly pressing the  key
key
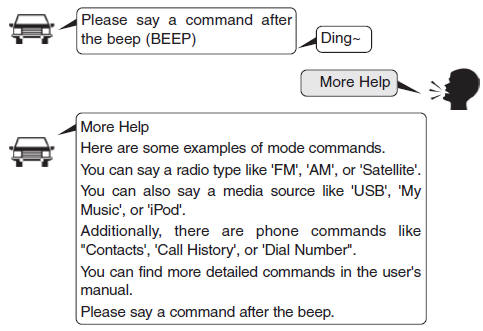
Skipping Voice Recognition
Shortly pressing the  key
key

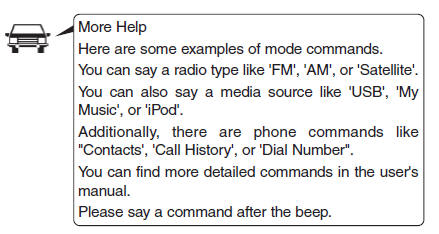
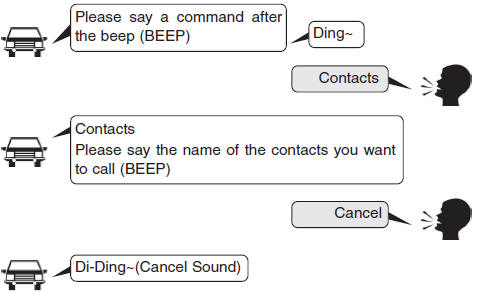
End voice command.
Shortly pressing the  key
key
Voice Command List
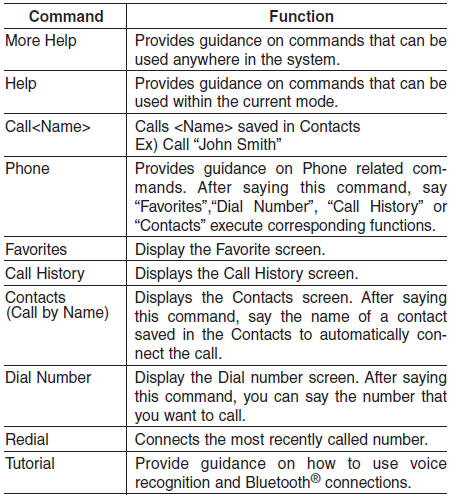
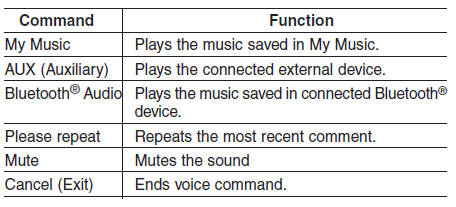
Common Commands:
These commands can be used in most operations. (However a few commands may not be available during certain operations)
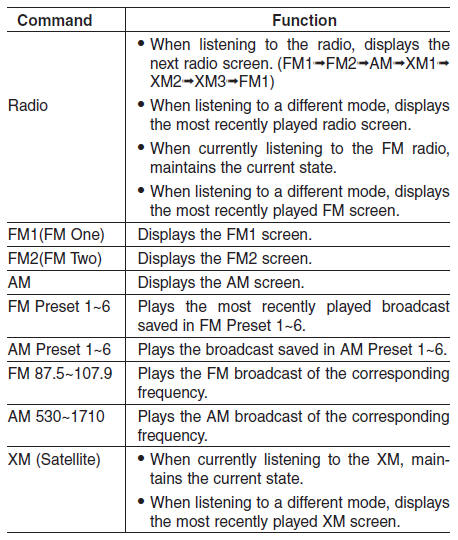
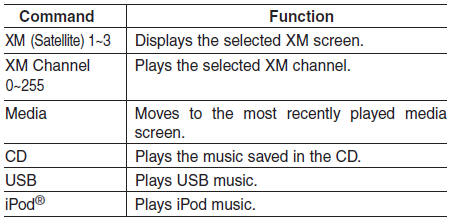
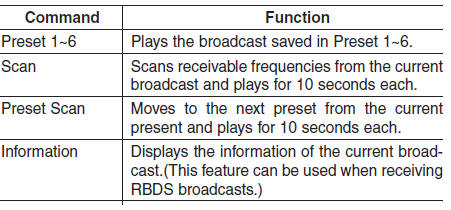
FM/AM radio commands:
available during FM, AM radio operation
Satellite radio commands:
Commands that can be used while listening to Satellite Radio.
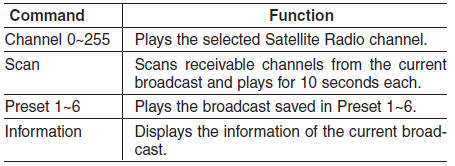
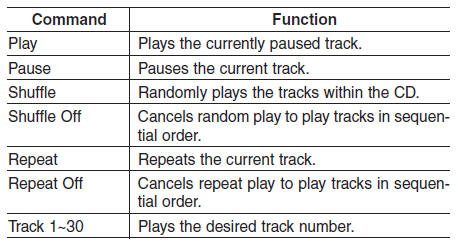
Audio CD commands:
Commands available during Audio CD operation
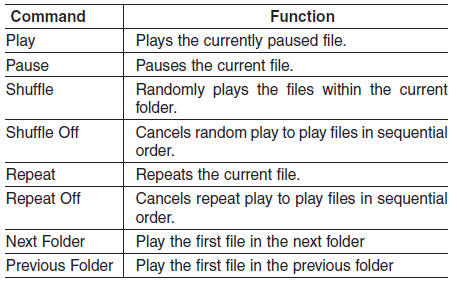
MP3 CD / USB commands:
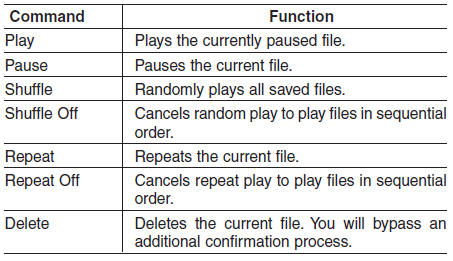
Commands available during USB and MP3 CD operation
iPod® Commands:
Commands available during iPod® operation
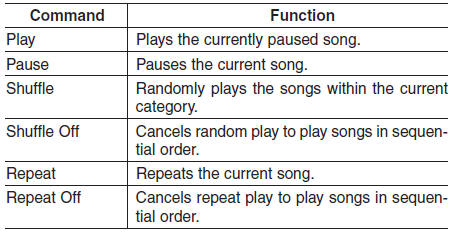
My Music Commands:
Commands available during My Music operation
Setup
Starting Mode
Press the  key to display
![Hyundai Tucson: <b>Voice recognition</b> Hyundai Tucson: <b>Voice recognition</b>. You can select and control options related to [Display], [Sound], [Clock/Calendar],](images/3/page.h329.gif)
You can select and control options related to [Display], [Sound], [Clock/Calendar], [Phone] and [System].
Display Settings
Adjusting the Brightness
Press the ![Hyundai Tucson: <b>Voice recognition</b> Hyundai Tucson: <b>Voice recognition</b>. Select [Display]](images/3/page.h330.gif) key
key
![Hyundai Tucson: <b>Voice recognition</b> Hyundai Tucson: <b>Voice recognition</b>. Select [Brightness]](images/3/page.h331.gif) Select [Display]
Select [Display]
 Select [Brightness]
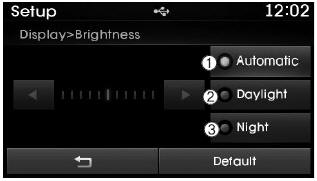
Use the  ,
,
 buttons to adjust the screen brightness
Press the  button to reset.
1) Automatic : Adjusts the brightness automatically
2) Daylight : Always maintains the brightness on high
3) Night: Always maintains the brightness on low
Pop-up Mode
Press the ![Hyundai Tucson: <b>Voice recognition</b> Hyundai Tucson: <b>Voice recognition</b>. Select [Display]](images/3/page.h336.gif) key
key
![Hyundai Tucson: <b>Voice recognition</b> Hyundai Tucson: <b>Voice recognition</b>. Select [Mode Pop up]](images/3/page.h337.gif) Select [Display]
Select [Display]
 Select [Mode Pop up]
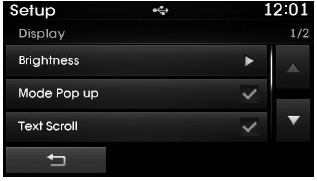
This feature is used to display the Pop-up Mode screen when entering radio and media modes.
When this feature is turned on, pressing the
 or
or
 key will display the Pop-up Mode screen.
✽ NOTICE
The media Pop-up Mode screen can be displayed only when two or more media modes have been connected.
Text Scroll
Press the ![Hyundai Tucson: <b>Voice recognition</b> Hyundai Tucson: <b>Voice recognition</b>. Select [Display]](images/4/page.h1.gif) key
key
![Hyundai Tucson: <b>Voice recognition</b> Hyundai Tucson: <b>Voice recognition</b>. Select [Text Scroll]](images/4/page.h2.gif) Select [Display]
Select [Display]
 Select [Text Scroll]
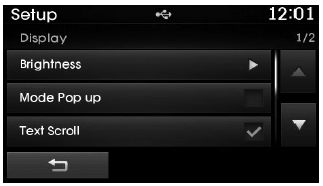
This feature is used to scroll text displayed on the screen when it is too long to be displayed at once.
When turned on, the text is repeatedly scrolled. When turned off, the text is scrolled just once.
MP3 Information Display
Press the ![Hyundai Tucson: <b>Voice recognition</b> Hyundai Tucson: <b>Voice recognition</b>. Select [Display]](images/4/page.h5.gif) key
key
![Hyundai Tucson: <b>Voice recognition</b> Hyundai Tucson: <b>Voice recognition</b>. Select [Media Display]](images/4/page.h6.gif) Select [Display]
Select [Display]
 Select [Media Display]
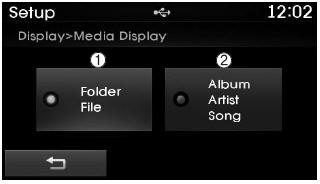
This feature is used to change the information displayed within USB and MP3 CD modes.
1) Folder File : Displays file name and folder name
2) Album Artist Song : Displays album name/artist name/song
Sound Settings
Sound Settings
Press the ![Hyundai Tucson: <b>Voice recognition</b> Hyundai Tucson: <b>Voice recognition</b>. Select [Sound]](images/4/page.h9.gif) key
key
![Hyundai Tucson: <b>Voice recognition</b> Hyundai Tucson: <b>Voice recognition</b>. Select [Sound Setting]](images/4/page.h10.gif) Select [Sound]
Select [Sound]
 Select [Sound Setting]
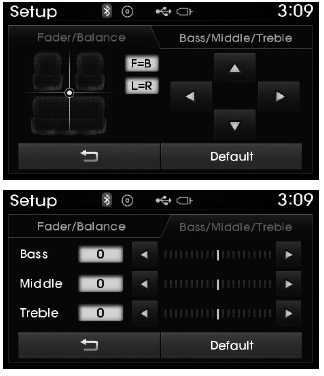
Use the  ,
,
 ,
,
 ,
,
 buttons to adjust the Fader/Balance
Use the  ,
,
 buttons to adjust the Bass/Middle/Treble
Press the  button to reset.
SDVC (Speed Dependent Volume Control)
Press the ![Hyundai Tucson: <b>Voice recognition</b> Hyundai Tucson: <b>Voice recognition</b>. Select [Sound]](images/4/page.h20.gif) key
key
![Hyundai Tucson: <b>Voice recognition</b> Hyundai Tucson: <b>Voice recognition</b>. Select [Speed Dependent Vol.]](images/4/page.h21.gif) Select [Sound]
Select [Sound]
 Select [Speed Dependent Vol.]
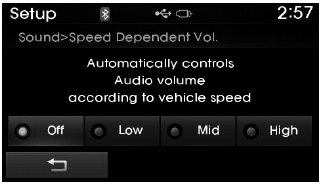
The volume level is controlled automatically according to the vehicle speed. SDVC can be set by selecting from Off/Low/Mid/High.
Voice Recognition Volume
Press the ![Hyundai Tucson: <b>Voice recognition</b> Hyundai Tucson: <b>Voice recognition</b>. Select [Sound]](images/4/page.h24.gif) key
key
![Hyundai Tucson: <b>Voice recognition</b> Hyundai Tucson: <b>Voice recognition</b>. Select [Voice Recognition Vol.]](images/4/page.h25.gif) Select [Sound]
Select [Sound]
 Select [Voice Recognition Vol.]
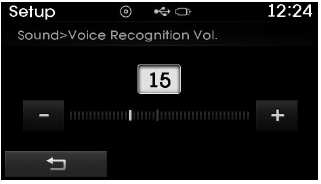
Turn the  TUNE knob to adjust the
Touch Screen Beep
Press the ![Hyundai Tucson: <b>Voice recognition</b> Hyundai Tucson: <b>Voice recognition</b>. Select [Sound]](images/4/page.h29.gif) key
key
![Hyundai Tucson: <b>Voice recognition</b> Hyundai Tucson: <b>Voice recognition</b>. Select [Touch Screen Beep]](images/4/page.h30.gif) Select [Sound]
Select [Sound]
 Select [Touch Screen Beep]
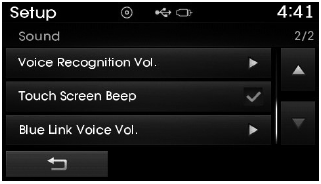
This feature is used to turn the touch screen beep on/off.
Blue Link Voice Volume
Press the ![Hyundai Tucson: <b>Voice recognition</b> Hyundai Tucson: <b>Voice recognition</b>. Select [Sound]](images/4/page.h33.gif) key
key
![Hyundai Tucson: <b>Voice recognition</b> Hyundai Tucson: <b>Voice recognition</b>. Select [Blue Link Voice Vol.]](images/4/page.h34.gif) Select [Sound]
Select [Sound]
 Select [Blue Link Voice Vol.]
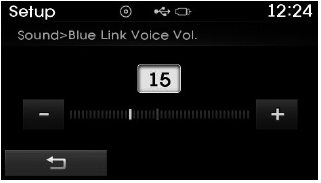
Turn the  TUNE knob to adjust the
❈ Blue Link┬« may differ depending on the selected audio.
Clock/Calendar Setting
Clock Setting
Press the ![Hyundai Tucson: <b>Voice recognition</b> Hyundai Tucson: <b>Voice recognition</b>. Select [Clock/Calendar]](images/4/page.h38.gif) key
key
![Hyundai Tucson: <b>Voice recognition</b> Hyundai Tucson: <b>Voice recognition</b>. Select [Clock Settings]](images/4/page.h39.gif) Select [Clock/Calendar]
Select [Clock/Calendar]
 Select [Clock Settings]
Use the  ,
,
 buttons to set the Hour, Minutes and
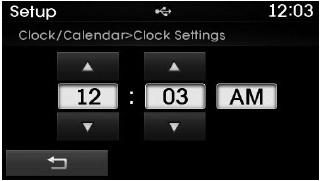
✽ NOTICE
Press and hold the  key
key
Calendar Setting
Press the ![Hyundai Tucson: <b>Voice recognition</b> Hyundai Tucson: <b>Voice recognition</b>. Select [Clock/Calendar]](images/4/page.h45.gif) key
key
![Hyundai Tucson: <b>Voice recognition</b> Hyundai Tucson: <b>Voice recognition</b>. Select [Calendar Settings]](images/4/page.h46.gif) Select [Clock/Calendar]
Select [Clock/Calendar]
 Select [Calendar Settings]
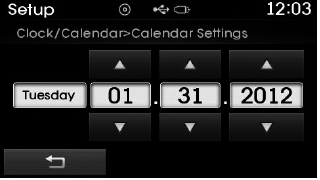
Use the  ,
,
 buttons to set the Month, Day and Year
Time Format
Press the ![Hyundai Tucson: <b>Voice recognition</b> Hyundai Tucson: <b>Voice recognition</b>. Select [Clock/Calendar]](images/4/page.h51.gif) key
key
![Hyundai Tucson: <b>Voice recognition</b> Hyundai Tucson: <b>Voice recognition</b>. Select [Time Format]](images/4/page.h52.gif) Select [Clock/Calendar]
Select [Clock/Calendar]
 Select [Time Format]
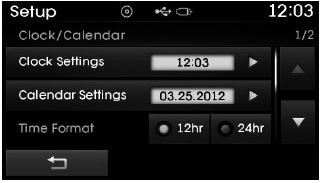
This feature is used to change the clock format between 12hr or 24hr.
Clock Display
Press the ![Hyundai Tucson: <b>Voice recognition</b> Hyundai Tucson: <b>Voice recognition</b>. Select [Clock/Calendar]](images/4/page.h55.gif) key
key
![Hyundai Tucson: <b>Voice recognition</b> Hyundai Tucson: <b>Voice recognition</b>. Select [Clock Display (Power off)]](images/4/page.h56.gif) Select [Clock/Calendar]
Select [Clock/Calendar]
 Select [Clock Display (Power off)]
This feature is used to display a clock on the screen when the audio system is turned off.


